3+9 Free Homemade Gift Ideas

Free homemade gift ideas and unique craft ideas for personalized, homemade gifts.
Nothing better than homemade craft ideas to spread your love around! Skip directly to the craft of your choice:
Silhouettes / Special Notebook / Handmade Doorstop.
To check out all of the homemade craft projects (including some bonus material), just read on!
Free Homemade Gift Ideas, #1:
"Paint" a Portrait
Being van Gogh is not required for this project. In fact, it would probably get in the way!
While it's not always a good idea to give people things in frames (they feel they have to hang those things up in their homes), this one may well get you a rapturous response.
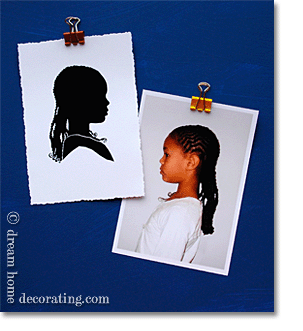
Free homemade gift ideas: Paper Silhouettes
Of all the free homemade gift ideas on this page, it's both the cheapest and the most sophisticated-looking. Particularly if you're going to create a series of silhouettes for a whole family.
You will need:
♦ a camera
♦ scissors
♦ white paper/card
♦ access to a b/w photocopier (or scanner) with a scaling function
For Option A (below):
♦ pencil
♦ black India ink/gouache
♦ soft paint brushes (fine & medium)
♦ bleed-proof transparent paper for type layout
For Option B (below):
♦ black spray paint, gouache, or India ink
To Make:
1. Make up an excuse for photographing the intended recipient in profile, against a light, plain background.
♦ Tell him/her not to smile, whatever they do. Or try to be really boring and dull around them. (If they smile it will scrunch up their profile.)
♦ Hold the camera level with their head and check that the profile is in focus.
♦ Take several pictures to ensure that one of them comes out perfect.
(If you know this person doesn't like their own profile, you may want to pick other handmade craft ideas for them. Or create a silhouette of their spouse - or their kids/grandkids/dachshund.)
2. Scale the photo up to A4/letter size on a black-and-white photocopier.
3. Now choose option "a" or "b":
Option a. Overlay the photocopy with a sheet of bleed-proof transparent paper for type layout, and draw along the profile. Try to clean up a few things as you go along - straighten the nose just a little, firm up the chin, fluff the hair - tiny "corrections" that the recipient might appreciate. Next, fill in the outline with black India ink, or other black paint that won't run.
Option b. Alternatively, cut the profile out of the photocopy with a pair of scissors or a craft knife, "edit" where you think necessary, and then (spray-) paint the head shape completely black. Don't worry if you haven't cut entirely smooth lines: almost all blemishes will disappear in the next step.
4. Once the black paint is dry, photocopy again, with clean white paper for
a background - and this time scale it down to 1/4 of the size, so that the
silhouette would fit nicely onto an A4/letter sheet that's twice been folded
in half. Use "business" weight paper for this photocopy (at least 80g/m2),
or go for ivory-colored, velvety stationery card, which will look much more elegant.
5. Frame & wrap, or present unframed in a flat box.
You never know - it may hang in their ancestor gallery next time you visit.
Free Homemade Gift Ideas, #2:
Special Occasion Notebook
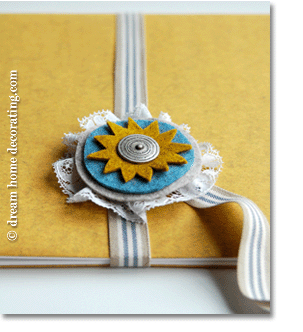
Make someone a little booklet for jotting down private thoughts and ruminations, or lay it out as a photo album, diary, or mini scrapbook. It's a very inexpensive homemade craft gift to make.
1. Buy a small, plain paperback sketchbook or notebook.
2. Wrap the cover in ...
♦ heavy-quality giftwrap, or
♦ a large-scale photo/photocopy, or
♦ a beautiful page from a calendar or fashion magazine,
♦ a map of Paris, or
♦ bits from a foreign-language newspaper, or
♦ a swatch of really nice fabric.
3. Measure a length of ribbon by wrapping
it once around the book and then adding 15cm/6in to that.
4. Glue the ribbon down along the center line of the book,
starting 1 inch from the front edge, round the back and all the way to
the front edge of the back cover, leaving the surplus length of strip dangling.
5. For the closure, choose a few
materials that look good together (like card, fabric, felt or lace).
Cut these into round (or otherwise pleasing) shapes, and layer them up
to form an ornate 'button'. You could top it off with a real button
if that works for the design.
Alternatively, choose a single, large (bought) button instead of creating one yourself from a stack of materials. Fabric-covered buttons will look particularly nice.
6. To prevent the booklet from ripping where the
button is attached, put a patch of strong sticky tape on the outside
and inside of the front cover where the button (stack) will go. Then
stitch the button (stack) onto the booklet with strong sewing thread.
(If you want to take the belt & braces approach and
make sure the button stays on for a looong time, place a smallish blob of strong
glue @ the bottom before you stitch.
7. "Lock" the book by sliding the ribbon under the bottom (layer)
of the button, and twisting it round once or twice.
Free Homemade Gift Ideas, #3:
Bonus Homemade Craft Ideas & Presents
Other gifts you could buy & personalize:
♦ Stamp/stencil some stationery with an ornament, or with the person's monogram. (Make colorful envelopes from magazine pages).
♦ Buy a tote bag and add a bit of 'jewelry' to one of the handles, for example a little mascot, or felted pom-poms that you've adorned with a generous amount of glitzy Swarovski-style crystals.
♦ Add a customized fabric label to a garment, bag, or notebook that you have been messing with. Print the label with the recipient's signature (using heat transfer paper), then stitch it on.
♦ Embellish a simple t-shirt, a fabric purse or a belt with a few lines of running stitch, or add a cluster of pretty (antique) buttons: If you have access to one of the 'treasure chests' of needleworking former generations, you can make up limitless free homemade gift ideas as you go along!
Free Homemade Gift Ideas, #4:
Giftwrap a Kilo of Sand
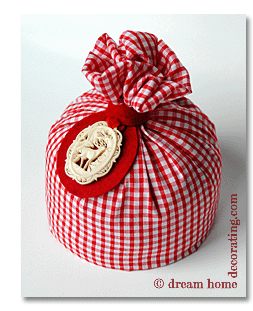
I know - you were with me up to this point, but now you're really wondering whether I've gone off the rails. (Pre-Christmas madness, maybe?)
Well, please bear with me for a moment longer. This is a cool, even cute, way to embellish someone's Great Indoors whilst keeping their back door open. It's a quick, no-sew, (more or less) free homemade gift idea, just in case you're pressed for time or strapped for cash.
You'll need
♦ a kilo or two of sand (I used 3 pounds for the doorstop in the photo)
♦ a soft plastic bag with absolutely no holes in it (not even tiny ones),
♦ 40x80cm nice looking fabric. Vintage fabric can look very good here; you may not need all of the 80cm, depending on the fabric thickness and the way you do the closure at the top.
♦ iron-on hem adhesive
♦ a piece of cardboard the size and shape of a CD/DVD.
To Make:
1. Cut a line from the outside of the cardboard "CD" into the middle, and cut a nickel-sized piece out of the center.
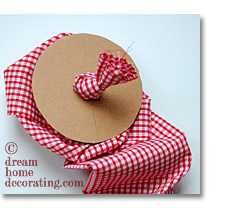
2. Using the hem adhesive, iron the fabric into a tube that's 19cm wide (if in doubt, measure & make sure it fits snugly around the 'CD'-shaped cardboard) and 80 cm long.
3. Turn the tube wrong side out, and close the bottom off with a tight knot.
4. Slide the knot through the slit, into the center hole
of the cardboard (widen the hole if you need to). This will be the bottom plate inside your doorstop;
the knot will disappear under the sand you fill in.
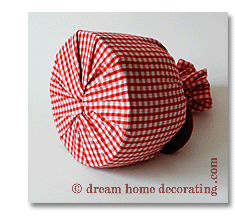
5. Now push the cardboard back into the tube, so the right side of the fabric shows.
Fill a plastic bag with sand and place it onto the cardboard bottom, right over the knot.
Carefully shake & knead the sand until the shape is right and the sand has filled any empty
spaces. Then seal the plastic bag securely (you don't want to turn someone's
living room into a beach).
6. Now fold the upper part of the fabric down into the tube. Either
close the doorstop off with a knot, or shorten the fabric before gathering
and tying it together with string. Finish off with some nice ribbon.
Free Homemade Gift Ideas, #5 - Bonus Material:
Doorstop Variations
A nameless kilo of sand may not be immediately understood as a gift from the heart. So go ahead and prettify your doorstop by adding:
♦ some 'bag jewelry' (see above)
♦ a few appliquéd fabric scraps (e.g. flower prints)
♦ tassels or pom-poms
♦ beadwork
♦ simple embroidery, like cross-stitch (Complete all embroidery before you start making the 'hose'.)
A Sophisticated Version:
If you like the general idea of a doorstop, but you'd prefer something slightly more cultured than the above, find a lovely antique handbag at a flea market or second-hand shop. Make sure the material is still in good nick - you don't want the bag to fall apart as soon as the thank-you note is in the mail.
Then re-purpose the bag:
♦ line it with plastic,
♦ fill with sand or pebbles and seal the plastic lining securely,
♦ make sure the handbag will stay closed when it gets scuffed around (it's safest to sew/stitch it shut!).
There. Give it a go. Experiment, tap into your own natural creativity. Develop your own, unique free homemade gift ideas. It only takes a small personal touch to warm someone's heart with your homemade holiday gift!
- There's a host of free homemade gift ideas on this site. For example,
try out some printable paper gifts:
♦ paper house lanterns,
♦ patterned printable lanterns, or
♦ paper Christmas tree ornaments. - For more free homemade gift ideas (not just for Christmas), go to the Christmas craft freebies section.
- Also, check out my printable Christmas cards!
- Top 100 Craft Sites
Yet to find the information you're looking for? Type a word or phrase into the search box below:
Return from Free Homemade Gift Ideas to Homemade Christmas Gift Ideas
Return from Free Homemade Gift Ideas to the Dream Home Decorating Homepage

